I don't have an Android tablet, but on a group I belong to they had a thread where they recommended all of these great apps. They sounded so cool that I now have my eye on for if/when I get one.
Some of these apps I know work on my Android phone, but I found I don't like drawing on a screen that small. You might not mind though.
So here are some drawing apps for Android that I know about based on that thread. (I think most have free and paid versions.)
Bamboo Paper
Art Flow
Sketchbook Pro (I do have the computer version of this and like it)
Clover Paint (the free version is called Clover Memo LITE)
Infinite Painter
When you look those up you'll also see suggestions for other apps that many seem to have good ratings that might be worth looking into as well.
And just for fun, there is an app called PiZen that helps you practice drawing perfect circles.
If you're interested in vector drawing (Inkscape was my introduction into becoming a late blooming artist) then try:
Adobe Illustrator Draw
Skedio
Ivy Draw
Paper Simple
Infinite design
I hope you'll enjoy these apps. I will try to enjoy them vicariously through you as best as I can. ;)

Wednesday, January 27, 2016
Thursday, January 29, 2015
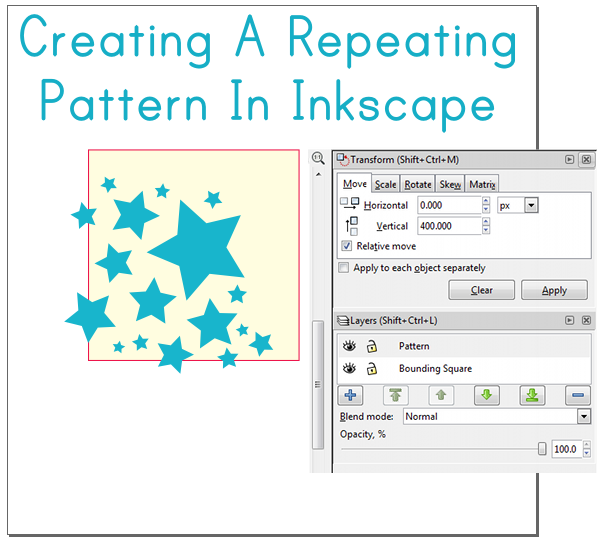
Pattern Tutorial for Inkscape
For some time now I wanted to create a tutorial on creating a Seamless Repeating Vector Patterns, like the one shown in this excellent video by SewHeidi, but adapted for Inkscape. I kept putting it off though, but recently Zazzle announced that they have added fabric to the products they sell. Since fabric obviously lends itself to repeating patterns, I thought I should push myself to finally write out the steps for a tutorial. It of course is also great for many other print on demand products, as well as the fabric printing site Spoonflower.
I really like this method because it can help create a look that is more random and scattered than other methods I have tried. I also find it relatively easy and less complicated than other methods I've tried in the past. For me it also helped me visualize, wrap my mind around, what is going on when I use image creation/editing programs that use offset (it may seem obvious to some people...but my mind doesn't seem to work that way).
Even if you don't use Adobe Illustrator I still recommend watching this video to get the general idea of this method. Especially since, out of laziness, I am not including many screenshots of the process. There are only a few differences in doing it with Inkscape, so I hope that after watching the video that reading the steps of my tutorial that it won't be too hard to follow.
It could be really useful to check out her other videos about repeating patterns here. I really liked the one called "Create a Seamless Repeating Vector Pattern Using Adobe Illustrator (the long version)" but I found that version was not precise enough to get my pattern to repeat perfectly...there were parts of the pattern that were off. So my tutorial is sort of a mix between the video shown here and that one.
 Okay, so to check out my Inkscape version of this method read on below...
Step One: In Inkscape create a Square with a Stroke around it with the Create Rectangles and Squares tool. This will be the boundary and guideline of your pattern. In this example, I've made mine 400 x 400 pixels.
Step Two: Create a new layer and fill with your pattern the way you want it to be, but with the right side and the top side clear of any objects, but the left and bottom sides can have the objects overlapping the edges.
The objects that overlap are what will create the repeating part of your pattern.
 Step Three: Select all of the objects that are overlapping the left edge of the square boundary. (You can hold down the Shift key while clicking on each object to select more than one at a time.) Press Ctrl+D to duplicate those objects.
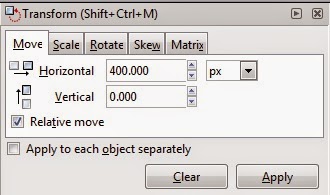
While the duplicated objects are still selected, choose Object from the Menu, then Transform (or Press Shift+Ctrl+M).
With the Move tab selected, make sure the Relative Move is check marked, then enter in the size of your bounding square in the horizontal field. So in this example my bounding square was 400 pixels, so I enter 400 into the horizontal field.
This makes it pretty easy to know what to put in the field for moving the object. It's just whatever size that you made your square be.
Then click on the Apply button. This should move your duplicated objects to the opposite side of the square.
Step Four: Press Clear on the Transform / Move menu area. Select the objects that are on the bottom edge of your square. Press Ctrl+D to duplicate those objects.
Enter in the size of your bounding square in the vertical field. So in this example my bounding square was 400 pixels, so I enter 400 into the vertical field. Then click on the Apply button.
Step Five: Fill in or adjust the objects in the center of the square, that do not overlap the edges, as desired.
*If you move any of the objects that overlap the edges you will need to re-do their corresponding object on the opposite side so that they will match up properly.
Step Six: To save/export your pattern select your bounding square, then in the Layers dialog box click on the Eye icon next to the layer that your square is on. So you can still see your pattern, but not the square (but you should still see a dashed line around the square, showing that it is still selected).
Then click on File, then Export Bitmap. Then make sure that the Selection button is selected (this is important), choose where you want your file to be saved and name your file, then click on Export.
Using the Selection button makes so that only the area in the selected area is saved, but since you hid the layer the square is on it won't show up in your saved pattern file.
You can now use the resulting image as a pattern in your program of choice.
To use it in GIMP you can check out this info from the GIMP website.
Some additional notes:
If you wanted to put your shapes on the right and top edges, instead of the bottom and left, when using the Move tool you would just need to enter in a minus sign in front of the number instead. So, using our previous example, you would put -400 instead of 400.
I hope that helps out. If it is too confusing or you have other input, please let me know, and I will try to clarify and update the tutorial.
I really like this method because it can help create a look that is more random and scattered than other methods I have tried. I also find it relatively easy and less complicated than other methods I've tried in the past. For me it also helped me visualize, wrap my mind around, what is going on when I use image creation/editing programs that use offset (it may seem obvious to some people...but my mind doesn't seem to work that way).
Even if you don't use Adobe Illustrator I still recommend watching this video to get the general idea of this method. Especially since, out of laziness, I am not including many screenshots of the process. There are only a few differences in doing it with Inkscape, so I hope that after watching the video that reading the steps of my tutorial that it won't be too hard to follow.
It could be really useful to check out her other videos about repeating patterns here. I really liked the one called "Create a Seamless Repeating Vector Pattern Using Adobe Illustrator (the long version)" but I found that version was not precise enough to get my pattern to repeat perfectly...there were parts of the pattern that were off. So my tutorial is sort of a mix between the video shown here and that one.
Step One: In Inkscape create a Square with a Stroke around it with the Create Rectangles and Squares tool. This will be the boundary and guideline of your pattern. In this example, I've made mine 400 x 400 pixels.
Step Two: Create a new layer and fill with your pattern the way you want it to be, but with the right side and the top side clear of any objects, but the left and bottom sides can have the objects overlapping the edges.
The objects that overlap are what will create the repeating part of your pattern.
While the duplicated objects are still selected, choose Object from the Menu, then Transform (or Press Shift+Ctrl+M).
With the Move tab selected, make sure the Relative Move is check marked, then enter in the size of your bounding square in the horizontal field. So in this example my bounding square was 400 pixels, so I enter 400 into the horizontal field.
This makes it pretty easy to know what to put in the field for moving the object. It's just whatever size that you made your square be.
Then click on the Apply button. This should move your duplicated objects to the opposite side of the square.
Step Four: Press Clear on the Transform / Move menu area. Select the objects that are on the bottom edge of your square. Press Ctrl+D to duplicate those objects.
Enter in the size of your bounding square in the vertical field. So in this example my bounding square was 400 pixels, so I enter 400 into the vertical field. Then click on the Apply button.
Step Five: Fill in or adjust the objects in the center of the square, that do not overlap the edges, as desired.
*If you move any of the objects that overlap the edges you will need to re-do their corresponding object on the opposite side so that they will match up properly.
Step Six: To save/export your pattern select your bounding square, then in the Layers dialog box click on the Eye icon next to the layer that your square is on. So you can still see your pattern, but not the square (but you should still see a dashed line around the square, showing that it is still selected).
Then click on File, then Export Bitmap. Then make sure that the Selection button is selected (this is important), choose where you want your file to be saved and name your file, then click on Export.
Using the Selection button makes so that only the area in the selected area is saved, but since you hid the layer the square is on it won't show up in your saved pattern file.
You can now use the resulting image as a pattern in your program of choice.
To use it in GIMP you can check out this info from the GIMP website.
Some additional notes:
If you wanted to put your shapes on the right and top edges, instead of the bottom and left, when using the Move tool you would just need to enter in a minus sign in front of the number instead. So, using our previous example, you would put -400 instead of 400.
I hope that helps out. If it is too confusing or you have other input, please let me know, and I will try to clarify and update the tutorial.
Friday, October 17, 2014
Changing the Background Color of Zazzle Product Images

Sometimes Zazzle designers want to use product images with their designs on it and use them for marketing purposes (and affiliates might want to too). They might want to take a picture of a mug with their design on and place it on the blog header they are creating or create a collage image of several products with their design on it. Those are just a few examples.
So they copy and paste the image into their image editing program. Or save it to their hard drive and open it with their image editing program. And then they start to remove/erase that white background with whatever method they use (eraser, color select, etc).
But there is a much quicker way. And it all involves the url address for the product image. In fact, the mug shown in the image here, I made the background transparent by changing some info in the url address for that image. Crazy, huh?
Getting the Product Image
If you are on a search results page for the image you want to use or in your store area, just right click on it and choose, "Copy Image Url" from the dialogue box that pops up.
However, if you are on the product page itself and try to right click on the image and right click on it...well you are going to get just a teeny tiny clear graphic. This is to try to protect the image from being stolen. So you need to go to where on the product page that it says, "Share" (it's under the "Add to Cart" button as of this writing) and click on that. Then click on "Link to This." There you will see an image of the product. Right click on that image and choose "Copy Image Url" or "Copy Image Location" (depending on what your browser says).
Now...Open a new tab in your browser and paste the url address in there. (This is where the "magic" begins.)
You will probably see something like this.
http://rlv.zcache.com/crazy_retro_cat_coffee_mug-rd884847c4b9f4a5d8fe14a1705c0c604_x7jgr_8byvr_325.jpg
Sometimes you might see a bunch of other things written after the .jpg part. Just delete those if you do see them.
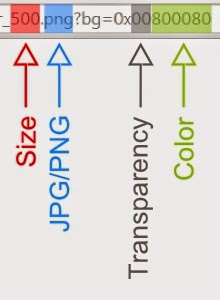
See that number right before the .jpg? That refers to the size of the image in pixels. Just change that to the size you want. I usually like 500 (if you choose 700 or larger it will add product info to the bottom of the picture). Then hit enter on your keyboard. This should change the product image in your browser.
Changing the Background Color
The default background color behind Zazzle product images is white. Say you want to make it black for some reason. To do this add this ?bg=0x00000000 to the end of the url address.
So your url address will look something like this.
http://rlv.zcache.com/crazy_retro_cat_coffee_mug-rd884847c4b9f4a5d8fe14a1705c0c604_x7jgr_8byvr_500.jpg?bg=0x00000000
Now hit the Enter key on your keyboard and see what happens.
What if you want another color? After that little "x" there are eight numbers. The last six numbers represent the color you want. These are Hex Code Colors. These six numbers represent colors and are used in many applications such as html code for websites (your image editing program might use them too).
Find a hex color you want to change the background to and replace those last six numbers with it. In this example I will use a purple hex code "800080"
http://rlv.zcache.com/crazy_retro_cat_coffee_mug-rd884847c4b9f4a5d8fe14a1705c0c604_x7jgr_8byvr_500.jpg?bg=0x00800080
When I hit the Enter key on my keyboard I see the background has turned purple.
Making the Background Color Transparent or Semi-Transparent
Cool. But what if you want the background of the product image to be transparent? We can do this too. (Note: this doesn't work on all product images. The ones I know of are t-shirts and those round "button" keychains, but there might be more.)
Okay, .jpg images can't be transparent, but .png images can. So we are just going to tell Zazzle to go to a .png image instead. Just delete the .jpg part of the url and write .png instead and hit Enter.
So your url address will look something like this.
http://rlv.zcache.com/crazy_retro_cat_coffee_mug-rd884847c4b9f4a5d8fe14a1705c0c604_x7jgr_8byvr_500.png?bg=0x00000000
Now remember that there are eight numbers after that "x" and the last six represents the color? Well the first two numbers represent transparency, this is the Alpha Hex Value (or something like that). Having the first two numbers be zeros makes the image transparent.
If you wanted the background to be solid then you would change the first characters from zeros to two letter f's. So it would be like this "?bg=0xff000000".
If you are interested in making the background semi-transparent check out this chart to find out what digits to use. http://wizti.com/blog/convert-opacity-to-hex-value
Now that you have the image the size that you want and the background color and/or transparency you want you can right click on the image and save it to your computer. Or in some cases you might want to just copy the url address and paste that into what you are using (for example, an online image editor that lets you open an image from a url address such as Pixlr Editor).
Changing the url address to show a .png version of the image and using this little bit of "code" "?bg=0x00000000" in the url address makes so you can get a transparent background on your Zazzle image must faster and cleaner than you would if you did it with an image editing program.
In the past I've been able to copy and paste the image into the application I've wanted to use it in, but that doesn't seem to be working anymore...I just get a black background now.
Tuesday, May 27, 2014
Free Vector Drawing Apps for Android
Free Vector Drawing Apps for Android
 I knew there were some drawing apps for the Android smartphones and tablets. But it suddenly occurred to me that there might be some Android drawing apps that are vector based. So I did a search on the Android Market and sure enough there are some vector based drawing apps. Here are the ones I found. (Note: I have not personally tried all of these.)
Infinite Design – This app has both a free version and a paid version (I’ve linked to the free version). They have a demo video that you can watch that made it look like it is fun to use. The images you create can be saved in either .jpg or .png format. And it can also be saved in .svg format…which you then can then open this file up and use it in other vector programs like Illustrator and Inkscape (they said it has been tested with these two programs…not sure how it would work with other programs). The fact that I can use this with Inkscape is what I really like about this vector drawing app. I did play with this app some and found it kind of confusing. Thankfully there are also a few YouTube tutorials for the Infinite Design vector drawing app to help you figure the features out. I also found it froze up on me a few times, but I am pretty certain this is a problem with my phone (which is running low on internal memory) and not the app.
This app really does seem worthwhile. One review on the paid version of this app even said they thought this app was better than the vector app Ideas by Adobe…which is only available for Apple devices.
Here are a few others that I have only briefly tried or not yet tried myself, but seem promising.
Vector Artist - This looks promising compared to some others. But I found it confusing at times. I would draw some lines, then try editing the points or do something else, and then couldn't figure out how to start drawing more lines again until I fiddled with it for quite some time. And then there are options which I cannot figure out what they do. It's not very intuitive, in my opinion and there are not any tutorials that I know of.
Simplector - One thing I liked about this is that there are help files included to help you learn how to use this.
SVG Notes - This app is not for creating great art (you will not be able to edit the nodes and such, like you can with some of the other apps I mentioned), but rather for sharing drawings and annotations with others. The product description says that among other things it can "Sync between two devices, draw strokes in parallel." (I did not test this feature.) Unfortunately, since sharing annotations are one of its main purposes it was too bad that I could not get the text feature to work at all.
imaengine camera effects - This is not a drawing app, but rather takes pictures (either from the gallery on your camera or from your phones camera) and turns them into vectors (with lots of different effects to choose from) that you can save in SVG format and then edit with a vector program such as Inkscape or Illustrator.
There may be other svg vector editor apps out there that I have not mentioned (as I did not care for them even with a quick glance) or others that I have not even run across. Sometimes I find hunting down certain kinds of apps not so easy. So if you know of any that should be tried, let me know.
Thursday, October 3, 2013
Zazzle's Gift Wrap Paper Tutorial

Well, I think, that if it is unique enough, something that a customer is unlikely to get anywhere else, that they might. And if that wrapping paper can be customized to have the message of their choice on it (such as "Happy Birthday, (Name they choose)" or even a photo of their choice (such as a baby picture of the person celebrating a birthday)...well it doesn't get any more unique than that and some people will be willing to pay for something that personalized.
Shown here is a cool, customizable, text based product that a Zazzle user called "logotees" designed. If you search Zazzle for things such as "custom" or "personalized" wrapping paper you will find even more examples.
With most of the Zazzle products there is one way you can tile images. You do this by clicking on the icon that looks like a Gear and choose, "Tile this image."
But by default the Zazzle wrapping paper has an additional tile option. There is a place in the tools area, when making wrapping paper, that says "Design Area: Tile." When you use the option then everything you put into that area becomes part of a "tile" that is repeated. (It helps to click on the "Show Art View" icon, that looks like a water drop, in order to see this better.)
The advantage to using the "Design Area: Tile" on the wrapping paper (instead of the Gear Icon "tile") is that everything you put in the the "Design Area: Tile" also tiles...including text that the customer can customize.
If you don't want to use the "Design Area: Tile" option you need to click on where it says that and choose "Design Area: Horizontal" instead.
For the best results when using the "Design Area: Tile" option use a square image. Using an image that you have made to tile seamlessly will work best too. (Use a search engine, such as Google, to look for tutorials on how to make seamless tiles for your image editing program of choice.)
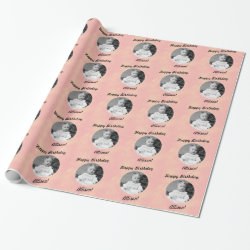 To show you the possibilities of what can be done with the wrapping paper I am going to try to explain how I made this one, shown here. (Click on the image to open it up in Zazzle and see how customers can customize it with their own words and picture.)
Sorry that I do not have pics of the steps. I do have a picture at the end of the tutorial with a diagram of many of the Zazzle options used in the tutorial though.
First, I made an image with a "frame" by cutting the center out and making the center transparent. It has to be a square image to work (since that is the work space size of the "Design Area: Tile").
I added the image to the product, but it made the image too small (leaving white space all around it), so I clicked on the "resize to fit available space" button. I think this needs to be done in most cases, especially if you are using a seamless tile.
Then I added the picture of the baby, and rearranged the order of the images to put it underneath the frame (do this by clicking on the image in the "list" of images and text area, beneath the tools, and "dragging and dropping" the image so it is in the order you want it).
Then I clicked on the Gear Icon and chose the "make this a template object" option to make so the image of the baby can easily be replaced by the customer to an image of their own.
Then I added the text and positioned it and made the text template objects too.
You could leave it at that. But in this case I did a few more things. I thought it looked a little boring so I selected the text and rotated it 30 degrees (to do this hold down the ctrl key and click on the "rotate" button and enter in the degree you want to rotate it to). Then I added another image that was made specifically to tile well to make the bows that repeat.
Below is a picture to help you identify some of the buttons/icons mentioned in this tutorial.

Thursday, August 23, 2012
Creating Outlined Text (or Objects) Using Inkscape
A little, basic tutorial showing how I go about creating a simple text design in Inkscape and add a texture/pattern to the text design using GIMP. Although I am using text here this basically can apply to objects you create in Inkscape as well.
There are three methods that I know of for creating an outline around text in Inkscape.
One is to simply use the stroke option and set the stroke to whatever number thickness you want. However, the stroke fills both the inside and outside of your text, so if you use a large thickness it can end up looking as shown in the first example shown below.
The second optiom is to create a copy of the text and use the Outset option to create an "outline" behind the text.
The third is to create a copy of the text and use the Dynamic Offset tool to create an "outline" behind the text. This third method creates a rounded appearance.
Update: You can use any of these options as a background for your text to create an outline. Just create your text, duplicate it, create your stroke or outline, change the color to what you want your outline to be, then move it back behind your main text.

So how do you create these three different looks?
1. Open Inkscape.
2. Type in your text. (If you plan to add a pattern to the lettering, as the original idea for this tutorial was going to include, I suggest a thick/fat font).
Adding a Stroke to Text:
There are a few different ways to add a Stroke to text or objects in Inkscape. Here is how I usually do it.
Hold the Shift key down and click on the color you want the stroke to be from the color palette at the bottom of the screen. Once you've done that a number appears next to the Stroke area. Right click on that to get a pop up menu of different numbers to choose from. Click on one of those numbers.
Methods for Adding a Background Outline to Text:
Select the text and press CTRL+D on the keyboard to duplicate the text (or select Edit > Duplicate). Select the fill color to be what you want the outline to be. Lower selection to the Bottom (there are a few ways of doing this...one simple way is to select the item and press the Page Down key on your keyboard).
Then choose one of the following:
Method One (Outset):
Select Path > Outset, or use the shortcut keys of ctrl + 0 (that's a zero...Inkscape shows this shortcut as ")ctrl + )" but I find that confusing, it makes me think I need to hold down the shift key to use the parenthesis symbol, but I have never needed to). Repeat until you have the desired thickness for the letters outline.
Method Two (Dynamic Offset):
Select Path > Dynamic Offset, or use the shortcut keys of ctrl+J. When you do that a little tiny diamond shaped node will appear. Use your mouse to click on the node and drag the node out to increase the size of the object (you can also go in if you want to decrease its size).

GIMP Grunge Tutorial
This is a grunge method using GIMP that I used for working on a large image where I didn't want to use grunge brushes, except maybe for touching up smaller areas.
1. Open a photo of something with a lot of texture in GIMP. (I used an image of a photo I took of part of some metal that was rusty, had peeling paint, gouges, etc. in it. You can also find pictures like this online that are free for commercial use. You can try searching for things like "free textures" or "free textures for photoshop", etc and find some. Here is one source. http://mayang.com/textures)
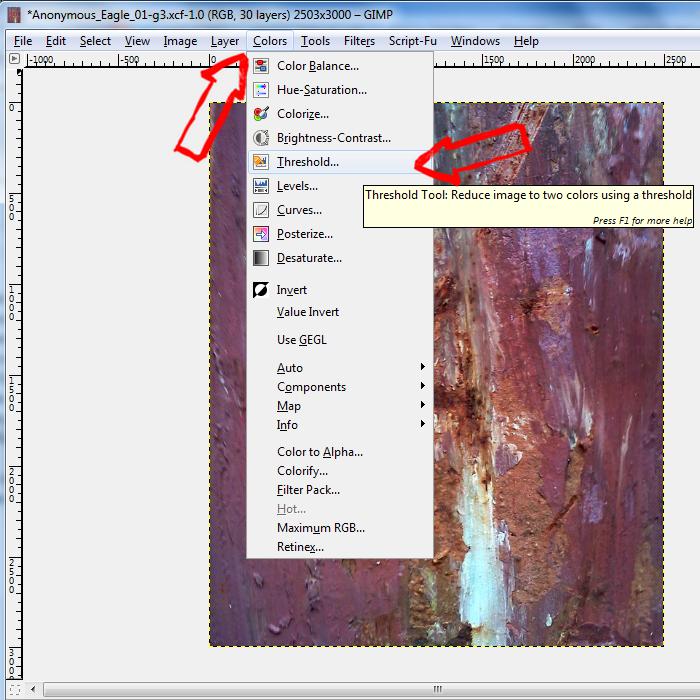
2. Click on Colors in the menu bar. Chose "Threshold." This turns the layer into a black and white image (you can mess with the options to get the balance of white and black that you want). Click on Okay when you are done. If you like you can also then click on Colors from the menu and then Invert to switch the black and white colors.


3. Add the image you want to "grunge up" as a new layer. (You can do this by clicking on Files and then Open as Layers.)
4. Use the color select tool to either select the white or black part of the texture (choose whichever one you think will give you the results you want).
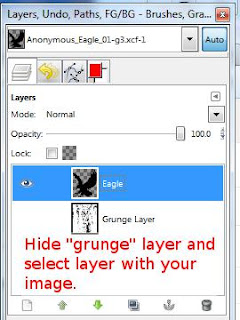 5. Hide the grunge layer by clicking on the "eye" icon (this is actually
optional, but I think it makes it easier to see what you are doing) and
click on the layer that has
the image you want to grunge up and press "Delete" or ctrl+X. Press
shift+ctrl+A (or choose Select from the menu bar and then None) to
unselect the "grunge" texture.
5. Hide the grunge layer by clicking on the "eye" icon (this is actually
optional, but I think it makes it easier to see what you are doing) and
click on the layer that has
the image you want to grunge up and press "Delete" or ctrl+X. Press
shift+ctrl+A (or choose Select from the menu bar and then None) to
unselect the "grunge" texture.

As you can tell, a lot of the tail area on this eagle got removed. You can use some grunge brushes to erase some additional areas and fill in some areas where too much areas had been removed.
(There are many grunge brushes that are free to use on the Internet...just search for GIMP or Photoshop grunge brushes. If you are using a GIMP 2.4 and above you should be able to use Photoshop brushes. Just make sure the creator of the brushes allows for commercial use of them if you intend to use your design on print on demand sites or other commercial purposes.)
Or copy and paste bits of the image to fill in areas. Experiment to find what works for you.
You could use this info to create your own GIMP brushes too if you wanted. Here's some links about making GIMP brushes if you are interested.
http://www.gimp.org/tutorials/Custom_Brushes/
http://www.gimptalk.com/index.php?/topic/445-lets-create-some-brushes/
1. Open a photo of something with a lot of texture in GIMP. (I used an image of a photo I took of part of some metal that was rusty, had peeling paint, gouges, etc. in it. You can also find pictures like this online that are free for commercial use. You can try searching for things like "free textures" or "free textures for photoshop", etc and find some. Here is one source. http://mayang.com/textures)
2. Click on Colors in the menu bar. Chose "Threshold." This turns the layer into a black and white image (you can mess with the options to get the balance of white and black that you want). Click on Okay when you are done. If you like you can also then click on Colors from the menu and then Invert to switch the black and white colors.

This is the result I got.

4. Use the color select tool to either select the white or black part of the texture (choose whichever one you think will give you the results you want).

 5. Hide the grunge layer by clicking on the "eye" icon (this is actually
optional, but I think it makes it easier to see what you are doing) and
click on the layer that has
the image you want to grunge up and press "Delete" or ctrl+X. Press
shift+ctrl+A (or choose Select from the menu bar and then None) to
unselect the "grunge" texture.
5. Hide the grunge layer by clicking on the "eye" icon (this is actually
optional, but I think it makes it easier to see what you are doing) and
click on the layer that has
the image you want to grunge up and press "Delete" or ctrl+X. Press
shift+ctrl+A (or choose Select from the menu bar and then None) to
unselect the "grunge" texture.
Here are my results.

As you can tell, a lot of the tail area on this eagle got removed. You can use some grunge brushes to erase some additional areas and fill in some areas where too much areas had been removed.
(There are many grunge brushes that are free to use on the Internet...just search for GIMP or Photoshop grunge brushes. If you are using a GIMP 2.4 and above you should be able to use Photoshop brushes. Just make sure the creator of the brushes allows for commercial use of them if you intend to use your design on print on demand sites or other commercial purposes.)
Or copy and paste bits of the image to fill in areas. Experiment to find what works for you.
You could use this info to create your own GIMP brushes too if you wanted. Here's some links about making GIMP brushes if you are interested.
http://www.gimp.org/tutorials/Custom_Brushes/
http://www.gimptalk.com/index.php?/topic/445-lets-create-some-brushes/
Subscribe to:
Posts (Atom)