

Well, I think, that if it is unique enough, something that a customer is unlikely to get anywhere else, that they might. And if that wrapping paper can be customized to have the message of their choice on it (such as "Happy Birthday, (Name they choose)" or even a photo of their choice (such as a baby picture of the person celebrating a birthday)...well it doesn't get any more unique than that and some people will be willing to pay for something that personalized.
Shown here is a cool, customizable, text based product that a Zazzle user called "logotees" designed. If you search Zazzle for things such as "custom" or "personalized" wrapping paper you will find even more examples.
With most of the Zazzle products there is one way you can tile images. You do this by clicking on the icon that looks like a Gear and choose, "Tile this image."
But by default the Zazzle wrapping paper has an additional tile option. There is a place in the tools area, when making wrapping paper, that says "Design Area: Tile." When you use the option then everything you put into that area becomes part of a "tile" that is repeated. (It helps to click on the "Show Art View" icon, that looks like a water drop, in order to see this better.)
The advantage to using the "Design Area: Tile" on the wrapping paper (instead of the Gear Icon "tile") is that everything you put in the the "Design Area: Tile" also tiles...including text that the customer can customize.
If you don't want to use the "Design Area: Tile" option you need to click on where it says that and choose "Design Area: Horizontal" instead.
For the best results when using the "Design Area: Tile" option use a square image. Using an image that you have made to tile seamlessly will work best too. (Use a search engine, such as Google, to look for tutorials on how to make seamless tiles for your image editing program of choice.)
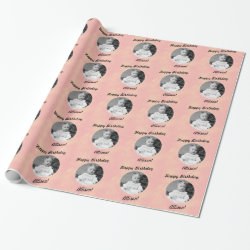 To show you the possibilities of what can be done with the wrapping paper I am going to try to explain how I made this one, shown here. (Click on the image to open it up in Zazzle and see how customers can customize it with their own words and picture.)
Sorry that I do not have pics of the steps. I do have a picture at the end of the tutorial with a diagram of many of the Zazzle options used in the tutorial though.
First, I made an image with a "frame" by cutting the center out and making the center transparent. It has to be a square image to work (since that is the work space size of the "Design Area: Tile").
I added the image to the product, but it made the image too small (leaving white space all around it), so I clicked on the "resize to fit available space" button. I think this needs to be done in most cases, especially if you are using a seamless tile.
Then I added the picture of the baby, and rearranged the order of the images to put it underneath the frame (do this by clicking on the image in the "list" of images and text area, beneath the tools, and "dragging and dropping" the image so it is in the order you want it).
Then I clicked on the Gear Icon and chose the "make this a template object" option to make so the image of the baby can easily be replaced by the customer to an image of their own.
Then I added the text and positioned it and made the text template objects too.
You could leave it at that. But in this case I did a few more things. I thought it looked a little boring so I selected the text and rotated it 30 degrees (to do this hold down the ctrl key and click on the "rotate" button and enter in the degree you want to rotate it to). Then I added another image that was made specifically to tile well to make the bows that repeat.
Below is a picture to help you identify some of the buttons/icons mentioned in this tutorial.
