1. Open a photo of something with a lot of texture in GIMP. (I used an image of a photo I took of part of some metal that was rusty, had peeling paint, gouges, etc. in it. You can also find pictures like this online that are free for commercial use. You can try searching for things like "free textures" or "free textures for photoshop", etc and find some. Here is one source. http://mayang.com/textures)
2. Click on Colors in the menu bar. Chose "Threshold." This turns the layer into a black and white image (you can mess with the options to get the balance of white and black that you want). Click on Okay when you are done. If you like you can also then click on Colors from the menu and then Invert to switch the black and white colors.
This is the result I got.
4. Use the color select tool to either select the white or black part of the texture (choose whichever one you think will give you the results you want).
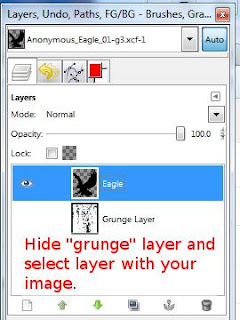
 5. Hide the grunge layer by clicking on the "eye" icon (this is actually
optional, but I think it makes it easier to see what you are doing) and
click on the layer that has
the image you want to grunge up and press "Delete" or ctrl+X. Press
shift+ctrl+A (or choose Select from the menu bar and then None) to
unselect the "grunge" texture.
Here are my results.
As you can tell, a lot of the tail area on this eagle got removed. You can use some grunge brushes to erase some additional areas and fill in some areas where too much areas had been removed.
(There are many grunge brushes that are free to use on the Internet...just search for GIMP or Photoshop grunge brushes. If you are using a GIMP 2.4 and above you should be able to use Photoshop brushes. Just make sure the creator of the brushes allows for commercial use of them if you intend to use your design on print on demand sites or other commercial purposes.)
Or copy and paste bits of the image to fill in areas. Experiment to find what works for you.
You could use this info to create your own GIMP brushes too if you wanted. Here's some links about making GIMP brushes if you are interested.
http://www.gimp.org/tutorials/Custom_Brushes/
http://www.gimptalk.com/index.php?/topic/445-lets-create-some-brushes/


No comments:
Post a Comment